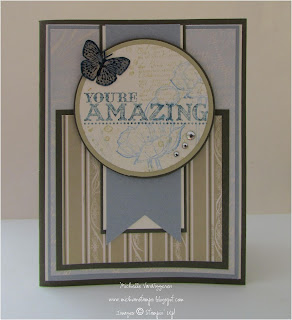
Wednesday, June 26, 2013

"I Dig You" Photo Holders

In yesterday's post, I showed you the appreciation gifts I created for my co-teachers at last week's vacation bible school (vbs).  Up today are the photo holders I created for each person in our class.  Our vbs theme was "Dig Down Deep" and included both construction and dinosaurs as part of it, so I decided to use the now retired Dinoroar stamp set and a color scheme of Pumpkin Pie, Daffodil Delight, Going Gray and Basic Black.  Here's how the photo holders turned out:


On the back, I added the info about our class (we were the Stegosaurus class), and the Bible verse we memorized that week:


Here's a closer view of the dinosaur stamping:


To create the holder, I started with a piece of 5-1/2 x 8-1/2" Pumpkin Pie.  I scored it at 6-1/4" on the 8-1/2" side, and folded it.  I added a 5-1/2" x 2" piece of Going Gray to the short side of the Pumpkin Pie.  A bit of sticky strip on each side, and it was ready to hold photos!


- Michelle

Tuesday, June 25, 2013

Bloomin' Bouquet Thank Yous

Last week, my boys and I had a fun week "Digging Down Deep" at our church's vacation Bible school.  I wanted to prepare a special treat for my awesome co-teachers, and decided to start by creating some flowers for them with the Bloomin' Bouquet kit (love this kit! In fact, have my own little jar of flowers brightening up a table in my craft area).  

Anyway, for my vases, I "up-cycled" some glass jars.  I filled them with some chocolate treats as well as the flowers.  To dress up the outside of the jars, I wrapped some Epic Day Washi Tape around them, and added elements included in the Bloomin' Bouquet kit:


While I was taking pictures, Isabella popped in (or "photo-bombed" as my boys like to say), with a little reminder to take time to smell the flowers . . .  even if they are made of paper!


Thanks for stopping by!

- Michelle

Friday, June 14, 2013

Gingham, Gold and Rose Thank Yous

For a recent workshop, I wanted to design a fun, summery thank you card that could be used for a teacher appreciation card.  I found inspiration for the card on page 16 in the May/June Stampin' Success (which is a special magazine exclusively for Stampin' Up! demonstrators -- these are filled with inspiring samples and great ideas!)  Anyway, here is my CASED version of the card I saw there:


Later, I decided it would be fun to add some more of the Simply Pressed clay roses, and I've had so much fun creating them, I had plenty to choose from!  Here are some of the variations I came up with:


Supplies Used:
Stamps:  Oh, Hello; Mosaic Madness
Inks:  Baked Brown Sugar (greeting), Island Indigo and Pear Pizzazz (on mosaic stamps), Melon Mambo Ink refill (on one-flower card and at least one flower with Melon Mambo on each of the other cards), Pool Party, Calypso Coral and Primrose Petal Ink Refills (for other clay flowers)
Paper:  Daffodil Delight, Brushed Gold, Whisper White Card Stock, and Gingham Garden Designer Series Paper
Accessories:  Buttons & Blossoms Simply Pressed Clay Molds, Simply Pressed Clay, Tea Lace Paper Doilies, Gingham Garden Washi Tape, Mosaic Punch, Rhinestone Jewels


- Michelle

Thursday, June 13, 2013

Roundin' Up a Few Western Themed Decorations

We recently had a Western-themed luncheon to say thank you to our church school volunteers, and I enjoyed helping plan and create the decorations!  For our centerpieces, we used Mason jars, filled with dry kidney beans, and I created some rosettes using Western-themed designer papers (mostly retired designs from Stampin' Up!).  It was pretty quick and easy to create the rosettes using the Simply Scored Tool, scoring whole sheets at once, then cutting to the desired size.  


The chalkboard signs were unfinished frames I found for $1 each, and "finished" by swiping Crumb Cake and Soft Suede inks across them to create a rustic wood look.  I placed a piece of Basic Black Card Stock in the frame, then wrote the message with chalk.

- Michelle

Tuesday, June 11, 2013

Baseball Coach Appreciation Cards & Gifts

My boys' Little League seasons wrapped up this past weekend, and we had a great time celebrating with each of their teams and at the league's closing day festivities.   For my little guy's Farm team, the other parents and I decided to give the coaches a special photo book, with pages for each of the players and coaches, as well as from special events like our opening day and Ultimate Skills Challenge.  I created the books in My Digital Studio, using the Game Day Photobook Template, which made it so easy to pull everything together!  Here's the page I created for my Timothy:


The baseball is from the Game Day Baseball digital stamps, and "Game On" is from the Sporting digital stamp set.  The letters of Timothy's name and the number 9 were created using the Timeless Type punches.

Today is actually Digital Download Day over at Stampin' Up!, so after you finish reading this post, be sure to head over and check out the great new downloads!  Here's the link.

I wrapped the photo books up with kraft wrapping paper, stamped with the baseball images from the Great Sport set, and tied with Cherry Cobbler/Whisper White Bakers Twine.


Here is one of the packages with the card tucked in:


And, here's the card design I came up with for Timothy's Farm Diamondback coaches:


The base is Riding Hood Red, with the flourish from the Great Sport stamp set heat embossed in Gold Stampin' Emboss Powder.  I also used gold embossing for the baseball image, the details on the black banners, and the "thankful for you" banner, which is from the Banner Greetings hostess exclusive stamp set.  Inside, I layered a piece of Whisper White card stock for a special message and the players' signatures.

For Daniel's Minor Red Sox coaches, I used the same stamps and design, but a slightly different color scheme:


Here are some close ups of the images:


Again, the base is Riding Hood Red, but I embossed in silver, except the baseball, which I still embossed with gold.  And, instead of black, I used Not Quite Navy for the banners on either side of the baseball.

My husband managed Daniel's team, and asked me to create a special thank you note he could give to the other coaches.  I decided to stick with the Great Sport images, and created another clean and simple design with that set:


The base for this card is a Whisper White Note Card.  The starburst image is stamped on in Real Red Classic Ink.  The baseball was stamped on a separate piece of Whisper White, using Crumb Cake and Cherry Cobbler markers to ink up the stamp, and then punched out with the 1-1/4" Circle Punch.

I haven't created a photo book for the Red Sox . . . yet . . . need to get to work on that, as I was hoping to have it ready by Father's Day!  Can't get it printed in time, but at least I'll be able to show Greg the electronic version.  In the meantime, here's a photo of Daniel, looking very thoughtful on the pitcher's mound, from this season:


Hope you enjoyed these baseball creations!

- Michelle
Monday, June 10, 2013

Fancy Favor Note Card Boxes

We're in the final school day countdown here . . . only two days left, and both of those are short days!  So, we're finishing up our end of year teacher gifts, as well as thinking about Father's Day -- that's sneaking up fast, too.

The project I have to share today would make a great teacher gift . . . or fun party favor, which is actually why I created these.  These little note card filled boxes were door prizes at a recent workshop:


Supplies used:
Stamps:  A Round Array, Itty Bitty Banners, Distressed Dots (retired), Mosaic Madness
Ink:  Versamark (for embossing), Baked Brown Sugar
Paper:  Not Quite Navy (retired); Riding Hood Red (retired), Brushed Gold, Whisper White
Accessories:  Fancy Favor Box (retired), Bitty Banners Framelits, 7/8" Scallop Circle Punch, 1-1/4" Scallop Circle Punch, Itty Bitty Shapes Punch Pack, Blossom Builder Punch (retired), Gold Embossing Powder, Pop Up Posies Designer Kit (from Spring Catalog, not currently available).   

Thanks for visiting!
- Michelle

Thursday, June 6, 2013

Teacher Appreciation Week Cards

My boys are almost done with their school year . . . just about 4 more school days to go.  A week or two back, we celebrated teacher appreciation week at their school, and I made some special cards for the teachers and staff.  I used a combination of current and retired Stampin' Up! products on each of these.

The first few cards use the Amazing Family stamp set.  I either omitted "such an" (using markers to ink up only the desired portion of the stamp), or added on "teacher" (again with Stampin' Write markers).


This card also uses the now-retired French Foliage and Kindness Matters as well as the brand new Simply Sketched Hostess set.

For the card below, I had fun creating some pinwheels with the die from the Stampin' Up! Spring Catalog.  There are In Color Dahlias in the center of each pinwheel.  I also used the Cloudy Day embossing folder in the background.  The butterfly is Midnight Muse card stock punched out with both the Elegant and Bitty Butterfly punches, and layered together with Pearl Jewels. The little frog is from the now retired Moving Forward stamp set.


The card below uses the Labels Framelits to create the focal piece for the greeting.  The flower strip, flower, and owl are die cut adhesives from the Play Date Quick Accents kit, which was available a year or two ago, but is still one of my favorite kits to use for school cards!  There are also a few Rhinestone Jewels to add a bit of sparkle.


The next four cards all have the beautiful "Thanks so much" greeting from the new Simply Sketched hostess stamp set, using different combinations of punches with it, and different of my favorite retired designer papers:


And, last but not least is a masculine card I made for the principal, using The Open Sea and Bitty Banners stamp sets:


Hope these inspire you for your end-of-school year thank you notes!

Thanks for stopping by!

- Michelle

Wednesday, June 5, 2013

My Case of Kay Sha's Wizard of OWLZ

A couple months back (although somehow it seems like only a week or so ago!), I was asked to create some projects for a Wizard of Oz themed birthday party.  One of the project ideas that came up while we were looking for ideas was Kay Sha's amazing Wizard of OWLZ punch art.  If you click on the links, you can see her Scarecrow, Dorothy, Lion, and Tin Man.  We didn't end up creating these at the party, but I wanted to send a special thank you to the birthday girl and her mom for having me at the party, so I "cased" Kay Sha's punch art and came up with this card:


These were really fun to create using the Owl Punch and a variety of other punches.  And, I did end up  creating my Dorothy Owl a bit differently from Kay's.  I used paper from the Tea for Two Designer Series Paper to create a blue and white gingham-ish dress, gave her some Marina Mist bows in her hair (using half a 4-petal flower from the Itty Bitty Shapes Punch Pack on each side), white sleeves (using the 8-petal flower from the Itty Bitty Shapes pack, with 4 scallops trimmed off), and sparkly red shoes out of Red Glimmer Paper (which Stampin' Up! hadn't introduced yet when Kay designed her owlz, but now makes creating the red shoes a breeze!).  Here's my Dorothy's close up:


The rainbow paper in the background of the card was left over from some rainbow-colored paper I'd created for the birthday girl and her friends to alter and decorate composition notebooks into "Over the Rainbow" journals.  To create the rainbow paper, I started with Whisper White Card Stock, then used a Stampin' Spritzer filled with a combination of ink refills and rubbing alcohol to add one color at a time.  The colors I used, in order, were Real Red, Peach Parfait, Lucky Limeade, Tempting Turquoise, and Rich Razzleberry.  For a finishing touch and a bit of sparkle, I sprayed on some Gold Smooch Spritz:


I was having such fun spraying on the colors, I didn't notice that I was being a little too enthusiastic with my spritzing, and somehow ended up getting Razzleberry all over one of our patio chairs:


Ooops!  Fortunately, it rinsed away easily!

Thanks for visiting my blog!

- Michelle

Monday, June 3, 2013

Happy Birthday Labels Window Card

It's the last day to order retiring stamps and accessories from Stampin' Up!'s 2012-13 Catalog!  So, I thought it would be a good day to show another recent card I created using a combination of brand new and retiring products.   This card uses the retiring Distressed Dots background stamp and Baja Breeze card stock, and the brand new Gingham Garden Washi Tape and Label Love Bundle:

'

Here it is fully closed:

And, open:


Supplies Used:
Stamps:  Distressed Dots, Label Love (part of Label Love bundle, including the stamp set & Artisan Label Punch, at a discount!)
Ink:  Baja Breeze, Regal Rose, and Raspberry Ripple Stampin' Write Markers; Baja Breeze Classic Ink Pad
Paper:  Baja Breeze, Whisper White, Melon Mambo, Island Indigo, So Saffron, and Lucky Limeade
Accessories:  Gingham Garden Washi Tape, Boho Blossoms Punch, Artisan Label Punch, Basic Pearl Jewels

Thanks for visiting my blog!

- Michelle

Saturday, June 1, 2013

Oh Happy Days!!!

Hi!  I'm back after a longer-than-intended blogging hiatus!!!  The last half of May went by a little too quickly around here -- although it was pretty fun-filled with plenty of my boys' baseball games, school activities, teacher appreciation week crafting, and stamping events!!!  That meant not so much time for blogging, but that I have some great projects to share as I get back to it now!

Plus, the really big exciting news is that the new Stampin' Up! 2013-14 Catalog is here!!!  And, it is filled with awesome new stamps, tools and accessories.  If you haven't seen it yet, you can click here to browse and enjoy it online -- or you can leave me a comment or send me an email to let me know if you'd like your own hard copy!

From May 31st until June 3rd, you can order both new and retiring products -- so if you still have some stamps or other items from the retiring lists on your wish list, now is the time to get them!!!  You can click here to shop in my online store.

Here's a fun shaker card project that I demonstrated at a recent event and that combines both new and retiring products:


Supplies Used:
Stamp sets:  Easy Events (retiring); Blue Ribbon (continuing); A Round Array (new); Mosaic Madness (new)
Paper:  Baked Brown Sugar (new In Color!); Island Indigo; Whisper White; Quatrefancy Specialty (new!); Watercolor Paper; Window Sheets
Inks:  Basic Black, Island Indigo, and Baked Brown Sugar Classic Stampin' Pads; 2012-14 Stampin' Write Markers; 2011-13 Stampin' Write Markers (retiring, although some colors are being incorporated into existing color families)
Accessories:  Shaker Frames (love how easy these make it to create a shaker card!!!!); Aqua Painters; Champagne Glass Stampin' Glitter; 1-3/4" Circle; 2-3/8" Scallop Circle; 1-3/8" Circle Punch; 7/8" Scallop Circle Punch; Circles #2 Originals Bigz Die.

Thanks so much for visiting my blog!

- Michelle